Videos for Online Parties (Part 3): Desktop Strategies for Uploading Videos for Facebook Parties
Videos for Online Parties (Part 3): Desktop Strategies for Uploading Videos for Facebook Parties
Creating original videos for your business is a huge step to breaking out of your comfort zone, so congrats! You’re doing an amazing job at crushing your goals!
If you’ve come this far in our series about videos then you’ve learned Why Videos are Great for Facebook Parties, How to Start Creating Videos for Facebook Parties, and also the Easiest Ways to Upload Your Videos from Your Smartphone.
Whether it’s your preference or your only option to use your computer for creating and/or uploading your videos, you’ll be happy to know…
…there’s a strategy for taking advantage of more options offered on the desktop version of Facebook for your business and Party videos.
Now, maybe you’re wondering:
How do I edit my videos on my computer?
Where do I upload my videos so they represent my business?
How do I add captions and subtitles to my videos?
What is the best way to share my videos to my Party groups?
We’re going to cover all of this and more, so let’s start with video editing tools for your desktop.
Video Editing Tools for Desktop
First, we wanted to offer some suggestions for editing your videos on your computer. We asked Kelly Paull for her favorite editing programs and here’s what she had to say:
“I use Screenflow to edit my videos on a Mac, Camtasia is the equivalent for PC users, but there are TONS of editing options for phone and desktop!
Canva [has] animation templates and the ability to create your own Gifs.
Wave.video is VERY similar to Canva, but is specifically for creating videos with video templates.” – Kelly Paull
If you want to record your computer screen to create a video, Zoom or Screenpresso are a couple of favorites.
For Mac Users
iMovie is already included with your Mac and makes it easy to upload recorded videos straight from your computer to edit. Choose themes to simplify the process or you can edit from scratch.
There’s plenty of basic editing options to make your video look pro and fun like adding text, recording voice over, noise reduction and equalizer, video speed, adding music, backgrounds, transition effects, and MORE!
You can look up help topics and tutorials from inside the program, or if you need more visual step-by-step help, you can always turn to YouTube. This beginner’s video by Howfinity is a great place to start.
How to Create “Native Facebook Videos” from Desktop
Next, a quick word about native Facebook videos.
They are videos that are uploaded or created directly from the Facebook platform. This means any videos that weren’t made elsewhere and then posted as a link, such as a YouTube video.
Native Facebook Videos by far get the most engagement of all the post types and the views they get are growing everyday. Plus, they play automatically in the post without taking the viewer away to another site or location on Facebook.
Using your Business Page is the perfect way to build your brand with native Facebook videos.
Your Party videos should also represent your Page anytime you repost them.
There are two ways to create native Facebook videos to represent your business page so you can share them in your Party groups.
Which way you choose depends on if you want to add Captions to your videos.
And to be honest, we recommend you use Captions because it’s proven to increase your engagement and reach.
I’ll tell you exactly how to do this later on in this article.
But first let me show you the two different ways you can can upload your videos:
- Upload them to an empty Public Business Page Group
- Upload them directly in your business page, which will allow adding captions!
First Way (When Not Using Captions): How to Upload Videos to an Empty Public Business Page Group
We know that many consultants want to keep some videos a secret until they post them in the Party group.
So after much experimenting, we found the easiest solution is to post your party videos in an empty public group linked to your business Page.
Here’s why:
When you share a video from this group, it will post as your Page and will play automatically in the post and anyone will be able to watch it without leaving their own Party group.
As long as you don’t approve anyone joining this public group, nobody will be notified of new posts as you upload your Party videos.
Unless they actually visit this public group, your new Party guests won’t see these videos and will most likely just watch what you post in their own Party group.
Here’s how:
- First, create a regular public group from your Facebook account, keeping it empty. Choose a simple name that wouldn’t get any attention, such as a numerical date.
- Go to Group Settings and add a trusted scheduling app such as PostMyParty. This makes it easier to schedule and share in your templates.
- Right underneath is Linked Pages where you can link your business page. This way you can post videos as your Page. Now, you’re ready to upload your videos!
- While “Interacting as your Page”, upload your finished videos. Include the correct text that goes with the video in the post.
- When uploading in the “Videos” or “Photos” section of the group, you will have a few options, such as:
- Add title and description
- Add to an album
- Tag friends, when you click to edit
- When uploading videos in a post, these are your options:
- Add post topic
- Check in
- Add feeling or activity
- Tag an event
- Support nonprofit
- Schedule the post
When you have your native Facebook videos uploaded as your business page, you are ready to share them to your Party groups!
If you want to take advantage of easily adding captions to your videos, you want to try the second way.
Second Way (When Using Captions): How to Upload Videos Directly to Your Business Page
Facebook has improved their Business Pages section on desktop so much that it’s even easier for small business videos to look professional and get more visibility with just a few steps in the new Publisher Tools section.
Uploading your videos to your business page gives you access to updated editing tools like auto-generated captions to improve visibility and engagement!
(Keep reading to find out how!)
It’s important to remember that they will be Public videos. This makes them super easy to view on the “Watch” section on Facebook and to be shared in any private Party Group so it will play automatically in the post.
Note, that you may only get these new options when using an updated browser, such as Chrome.
Here’s How:
Start at your business page, then click Publishing Tools under More, to get started.

You’ll see lots of options in the left hand menu that will benefit your business. But for now, click on Video Library.
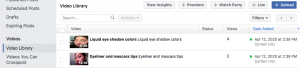
Click the blue Upload button, then select your video file from the pop up.
Next, you will create the video post.
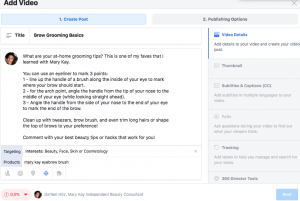
You can add the title, description, and tag topics, products, and more. You can go through the options in the right hand menu to improve your video post.
This includes changing the video thumbnail image and adding subtitles and captions, which we will show you below.
You can also do these steps later.
When you’re ready, continue to Step 2 for Publishing Options.
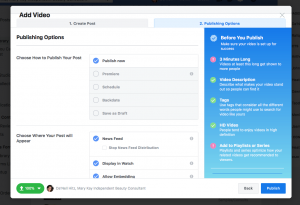
Here, you can choose how to publish your post, and where it will appear.
Explanations help you decide the best way to publish your videos.
You can also choose to add it directly to a playlist or series, make it available on other Pages you manage, and turn off certain features like comments, shares, and reactions.
TIP: If you don’t want your followers to be notified of this video being published, you can choose “Stop News Feed Distribution”.
It will still be viewable, searchable, and shareable, but it won’t show in the feeds of your followers like new posts usually would.
Add Captions to Your Videos to Increase Visibility and Engagement!
This is where your video can stand out without having to download another editing program!
Now maybe you’re thinking…”Why would you want to take the time to do this step?”
Great question. Let me explain.
Statistics show that 85% of Facebook users scroll through videos with the sound off!
They are more likely to watch if there are captions and they can ‘preview’ what the video is about.
This strategy will also help increase the visibility and reach of your videos, thus boosting engagement.
Using Captions is the way to capture and hold your guests’ attention quickly!
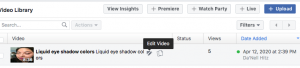
You can add captions to any video already uploaded to your Business Page. Just click the Edit Video option for the video in Publisher Tools.
The pop-up window will show Subtitles and Captions in the right hand menu. Go there, choose your Language preference, then click Auto-Generate.
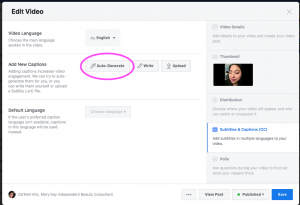
The Publisher Tool will automatically generate the text for the captions in your video.
Then, click the pencil icon so you can review and edit the text easily.
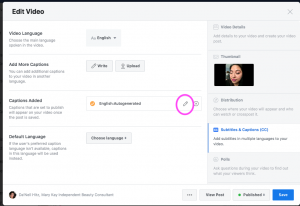
You want all the words to be correct to flow well with your video.


Voila!
The length of your video or how much talking is happening, will determine how long this step will take.
It will be worth it in the long run when your guests would rather keep the sound off when Partying after bedtime.
Share Your Native Videos to Online Parties while Representing Your Business
Now your videos are safely living in Facebook land and they are ready to be shared over and over into your Party Groups while representing your business.
Although you can easily share the video post directly from the options to an event, another group, or another page you manage, you might want to save time and energy in the long-run.
Because let’s be honest…searching for your videos to share them to multiple Parties this way will burn you out and limit your goals.
This is where scheduling apps like PostMyParty shine and are preferred by the most successful online Party planners. By simply saving your video links into your Party script templates, the possibilities are limitless!
When you schedule your video links to post to your Parties this way, they will show your scheduled post message as well as the original video post, and the video will play automatically without leaving the Party group.
Your Page will show when you select the option to post as a business page group (or similar settings. Check with your program assistants).
Here’s how to find and save your video links:
- Open the native Facebook video so it will play in full view.
- Then, copy the URL in the browser at the top.
- Next, go into your auto-posting program, such as PostMyParty, and create a Video Link Post using this copied link. You can save this post into any party script template and easily share it over and over.
Congratulations!
Now you know how to create your own Facebook Party Videos for your business!
If this was helpful, be sure to share this series with your team and give them a boost of confidence to conquer their parties with unique videos.
Next Steps
Trying to grow your business with Online Parties or trainings?
Now you can leverage powerful Online Parties without hours of work.
Get a Free 14 Day Trial of PostMyParty.
For 14 Days you’ll have access to:
- Full UNLIMITED Access to ALL Features
- Unlimited Scheduled Parties
- Unlimited Templates
- All Your Content is Private
- Comment Scheduling on Business Pages and Business Groups
- Template Sharing
Plus Bonuses!
- Access to a Private Facebook Strategy Group
- Live Support 7 Days a Week


.png)